Double Exposure
This can take a lot of time to perfect but with patience, you can achieve some interesting double exposure effects in the darkroom. You can sandwich two negatives together in the enlargers negative carrier. Align both negatives with their emulsion (dull side) facing down toward the easel.
This technique doesnt work well if the negatives are not of the same density (thickness) Getting the right exposure can take a few attempts so use test strips to determine the exposure before going ahead and printing.
I'm going to attempt this in the dark room, I will shoot a collection of portraits, landscapes and objects with my 35mm film. a silhouette of a person, maybe side profile and maybe a detailed landscaped exposed over it like dense trees or a landscape of buildings.
Sandwiching Technique
With my Canon SLR 50d I shot several silhouette images in studio of myself and other students in a profile portrait. I then shot a few landscape shots of students artwork displayed in the corridors for the background shots. After delveloping the negs I selected the two best negs ensuring that when sandwiched together they did not become too dense and then plcaed in a 35mm neg carrier in the enlarger. I set the aperture to 5.6 and first did a test strip of five second intervals. Below is the first image printed based on that result.
 |
| 1st print based on a five sec test strip, estimated I needed 20 secs, was a little underexposed as the edge of my silouhette was feathered. I did like the way the surround area was white though. |
 |
| With the second full print I increased my exposure to 25 and the magenta to 25. This has brought out the background a touch more but the edges are still feathered. |
 |
| The final print was a 29 second exposure with 25 magenta, not the silhouette is more defined. I was trying to achieve an exposure similar to the second image for the background and the exposure for the silhouette of the third image. I think for me to achieve this I would need to underexpose then burn the profiled area. I could also increase the contrast in lightroom or photoshop. |
Double exposure (in camera)
I went out on a little field trip with my 35mm sprocket rocket loaded with a black and white film. The film was a 35mm 400 so I metered for 200 iso in order for me to achieve correct exposure when I double exposed.
I metered using the sunny 16 method and the majority of my images were shot purposely on the sunny setting with the aperture of f 16. The other setting was cloudy with an aperture of f10.8. Even though it was cloudy I chose the sunny 16 setting as this would allow me to slightly underexpose, giving me the correct exposure when I double exposed that frame. The below images were focused with the 1m to infinity setting as they were landscape styled shots. the shutter speed was set at the day time setting of N setting (1/100).
 |
| Test strip 3 sec, enlarger was set at f8 |
 |
| Final print for double exposure |
I was quite happy with the level of exposure for the final frame and considering it was my first attempt there are only a few minor adjustments I would do next time.
- I would most definitely take advantage of the panoramic framing and print panoramic instead of with a 35mm neg carrier.
- I would like to try the above method of silhouettes with landscape backgrounds, similar to what I achieved sandwiching the two negatives like above.
- The actual image above could have been perfected with some dodging and burning. I would burn and dodge the shadows and highlights of the clouds in the sky and I would dodge the darker over exposed sections of the trees in the background landscape to even out the exposure of the trees across the image.
- The silhouette figure to the right could probably do with burning to match the contrast of the other two figures.
Photo montage technique dates back to as early as the late 1800s when Saint Thomas D'Aquin released his magical image Man Juggling His Own Head.
 |
| Man Juggling His Own Head, ca. 1880 Saint Thomas D'Aquin |
This technique is relatively easy to do. You simply print your selected negatives, carefully scalpel the image you wish to overlay and place on the background image. Then photograph another image of this and print.
I am in the process of developing my negatives to demonstrate my attempt at this method. I have used my SLR with black and white film and taken images of my daughter hanging from a climbing frame, the other image I will be using is of an analogue wall clock. I have developed the negatives so I will be in the darkroom on Tuesday or Wednesday to carry out the above steps.
I will upload my work and present is in a step by step manner later this week.
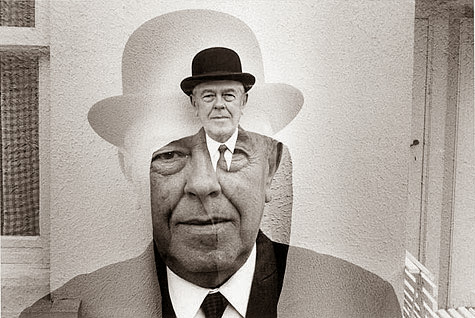
A later example of photo montage work is the work of Duane Michals. Duane is an American photographer specialising in sequential narrative techniques.
I particularly liked the collection of Magritte images. I have found nothing detailing his specific techniques for these images but I think from previous research on analogue techniques I think Michals used the double exposure and sandwiching techniques. click here
I particularly liked the collection of Magritte images. I have found nothing detailing his specific techniques for these images but I think from previous research on analogue techniques I think Michals used the double exposure and sandwiching techniques. click here